Trip to InspirationLand (AKA Ikea)

Hello there guys and dolls!

I have been suspiciously lacking in the craft department lately. Mainly due to lack of inspiration and frustration with the studio redo. Its hard to be crafty when your "creative space" is in shambles. (Sigh) But the studio is almost done...OK, about half done. But its getting there!

So in order to spark my creativity and on a mission to make my studio a creative place instead of just a room, I took a trip with my cousin to InspirationLand (AKA Ikea)! This was my first time going and let me just say.....AMAZING!!!! If you are near it and haven't been to the Ikea in Houston, TX you need to go! It is HUGE and shaped like Texas.

I got so many ideas for crafts and for my studio its unreal. I also bought some great little cabinet thingies for $5 a piece, a pendant light kit, a set of 6 glasses for $5 and a cute little panda. I also took some pictures that I am going to share with you!!!

These are the cutest little brackets that I want to hold up the shelves I'm going to put up over the craft table:

And they had these displays of some of their stuff hung like art. Like these plastic plates and bowls hung from the ceiling with fishing line:


So now I want to do that with some colorful art supplies for my studio! YAY!

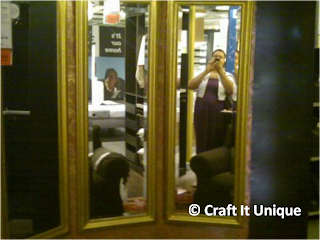
The great thing about Ikea to me is not the great stuff they have (and they have some GREAT stuff) but the best thing is HOW they put things together in the showroom. Like this. Its 3 full length mirrors arranged in a trifold like the mirrors in the dressing rooms.


They just put hinges on the outer mirrors so they are adjustable! So simple, but I've never thought of doing that.

There are much, much more, but these are the ideas I'm working on now to put in the studio. I will definitely keep you guys in the know about my studio redo!

Happy Crafting and DIYing!
~Amanda~

  • Digg
  • Del.icio.us
  • StumbleUpon
  • Reddit
  • RSS
Read Comments

Studio Revamp AKA Problems! Problems! Problems!

Hello there guys and dolls!

As you know from my studio door post, I am trying to revamp my studio. It had wood paneling and was just not functional as a studio (no shelving or storage!) and it was just dark and dank and not cute. See:


So my idea: Paint the paneling white! It will brighten it up and make it not feel so much like being in a pine box. What didn't occur to me? Research. Which is really weird because I LOVE to research EVERYTHING. But I got excited and went to get some paint and slapped it on the wall.

Problem #1? As I soon discovered, if you put latex paint onto wood paneling, you release sap from the wood that leaves horribly ugly yellow streaks down the wall. Yeah. Not quite the look I was going for.

So i had to make an emergency run to Lowe's and get some Oil based primer that will keep that from happening. So now that my wall looked fantastic, I discovered problem #2 . Oil based paint is STRONG in the fume department. My cousin and I were getting quite woozy even with the windows and door open and fans going.

Because of that, we decided to take a break to let the fumes dissipate. This is when problem #3 reared its ugly little head. Having never worked with oil based paint, I wasn't aware that water will not rinse this stuff off of you. You must have turpentine. Cue emergency Lowe's run #2.

Then in trying to get all the paint cleaned up, we used all the turpentine. I absolutely WAS NOT making another emergency Lowe's run! WAS NOT! So the walls are about 1/2 done. We are going to need another weekend to finish, but what's done looks great!


So. Yeah. My weekend was a series of missteps and messups. But we did have fun. Even if we are going to spend forever trying to get paint out of our hair.

~Happy Crafting~
Amanda

  • Digg
  • Del.icio.us
  • StumbleUpon
  • Reddit
  • RSS
Read Comments

Some great Craft blogs that I follow

Ok. So during my extended hiatus from blogging, I was reading a lot of other people's craft blogs and here are a few that I absolutely fell in love with.


One thing you should really know about me is that I have expensive tastes, but absolutely NO budget. So I DIY because I want the same looks but cheap. And I thought I was good at it...until I read the Dollar Store Crafts blog. There are DIYs in there that cost literally $1 or $5. I am so impressed with the sheer frugality that I fall on my knees and worship the ground she walks on.


Also on the really cheap but oh so cute side of things is the Thrifty Decor Chick. She is not only frugal and crafty, but she is funny as all get out. I literally hurt myself laughing every time I read her blog. She calls her sister "Stink Eye." Bwahahahahahaahaaahahahahahaahaaahahahahahaahaa! (Cough cough cough)...I'm ok. Anywho, she (like me) is a big fan of getting second hand stuff and making liberal use of paint (especially spray paint).

 Ok so if you go through a lot of craft blogs (like I do) you will discover an alarming trend. Most of the craft bloggers are women. Now being the equal rights type, this just rubbed me the wrong way, so I was tottally relieved to find a man made DIY blog (See what I did there?) And it's a great blog too. I don't know if he thinks out of the box because he's a man or because that's just his personality, but who thinks of making a bicycle tire into a hanging pot rack?  Yes...you read that correctly. BICYCLE TIRE INTO A POT RACK! And a darn cute one at that. I am in awe of your creativity.


This blog has something for everyone, kids crafts, home decor crafts, sewing patterns, great pictures, and a wonderful tutorial on turning hanging wire planters into a chandelier that I'm gonna try in a few days. I am so inspired just browsing through her blog.

So enjoy this list of great craft blogs. I know that there are more great ones out there, so as I find them I will update this post. Also, if you guys know of a great blog or website, leave me the link as a comment. (I do check all comments and also try to respond to all.)

Happy Reading and Happy Crafting!
~Amanda~

  • Digg
  • Del.icio.us
  • StumbleUpon
  • Reddit
  • RSS
Read Comments

My Crafted Studio Door!

Hello there after such a long time!

I know I haven't put anything on the old blog in FOREVER, but I've been staying busy and staying crafty. Hopefully (if the internet cooperates) I will be putting up several entries in the next few days. Please internet gods be with me ;).

So anyways, this particular post is about my studio door. About a week ago, I was sitting in my studio, praying for inspiration and getting severely off task. And it hit me...no inspiration or creativity because my studio space seriously is dark and drab and boring! Its got very 70s dark wood paneling :( Love the 70s, just not the wood paneling. So I came up with a plan to revamp the studio.

Step one: Brighten up the plain white door. 

 ***The before is actually the outer door of the studio. I didn't think to take pics before I did the inside part.***

See! Doesn't it look soooo much better? Also look at that horrible paneling. Ugh. I have a plan for that too. Also for the bottom panel of the door, but all that's for a little later.

What you need:
* Painters Tape (the blue kind)
* Sand paper
* Pencil
* Paint in your choice of color (I used craft paint, but you could use indoor paint. It will save you a step, but cost more and you WILL have paint left over.
* Protective clear coat paint (I used the spray paint one, but be careful and don't inhale. High from crafts is not a pretty picture!)
* A Protective mask (for sanding and paint fumes)
* Protective Goggles
* Ruler
* Foam Paint brushes

If the paint on your door is slick, you are going to want to sand it a bit to rough it up first!...oh and if you sand, use a mask. They used to put weird cancer giving things in paint (ie. lead and asbestos).  Better safe than sorry I always say...actually that's my mom...I say that Safety is Sexy! See:

Ok...not so sexy, but necessary regardless!

So basically what I did next was to take a painters tape (you know the blue kind) and mark off the panel thing on the door, so you don't paint outside of the panel.


Then I marked off the sides and top with my measurements. In my case, I wanted the diamonds to be kinda big and longer than they were wider, so I did 3 inch increments on top and bottom and 6 inches on the sides. That way my diamonds were 6 in tall and 3 in wide.


You may even get help with this from inquisitive kitties...

...OR NOT.


Then I took the painters tape and marked off my diamonds all the way across the paneling.

It was at this point, my other kitty helper, Elle came to help. She's not as "into stuff" as Cam is so I was pretty ok with her inspecting.


***MAKE SURE THAT YOU REALLY PUSH THE TAPE INTO THE CREASES ON THE EDGES, OTHERWISE YOU HAVE BLOBBIES LIKE THIS INSTEAD OF A CRISP LINE!***


Now for the fun part! TIME TO PAINT!! Not yet. Psyched you out didn't I? One more step before painting. I basically had 5 colors that I wanted to incorporate into the door: Red, a groovy pea green, teal blue, orange, and purple. And I didn't want any of the diamonds to be next to a diamond of the same color so i took that into account when I was marking which diamonds were which color. I put a little code on the wood itself to mark which were which color. "B" for blue, p for purple...you get the idea.


NOW its time to paint...no really...I'm serious this time. At this point, its kind of like a coloring book or paint by numbers. Paint inside the lines.

 I wanted a really vibrant color, so I put 2 coats. This is one coat:

Spotty right? This is with 2:


Like I mentioned before, I used regular craft paint. I did this for a few reasons. ONE...you won't use a lot of paint for this. TWO...craft paint is cheaper and comes in more varied colors (and I like cheaper). THREE...I already had the craft paint.


But if you use craft paint, you WILL have to put a clear protective coat on it. And that is the next step. (AFTER THE CRAFT PAINT DRIES COMPLETELY! OR YOU WILL SMEAR!) If you use interior paint, you don't have to do this step. And if you used craft paint and skip the protective coat...well...you will knock paint off every time you use the door...or touch the door...or the kids touch the door...you get the drift.

So finally we have our beautiful, bright, unique finished product:

 
I am soooo happy with my studio door. Only, I want to do the bottom panel in the same colors but different pattern, but that's a story for another post.

Hope you enjoyed this! Happy Crafting!
~Amanda~
  • Digg
  • Del.icio.us
  • StumbleUpon
  • Reddit
  • RSS
Read Comments